Main menu
Main menu consists of four different views: Customers, Products, Events and Documents
The selected menu tab is highlighted in Red
Above the menu tabs is a status bar that, depending on the view, displays username, opened tab or window name or current order’s total sum
Customers
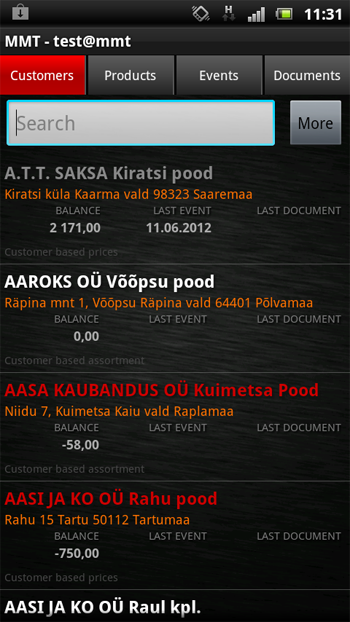
The Customer list displays up to 250 corresponding entries at a time in alphabetical order.
Customer list displays for each customer:
- Name - name of a customer store or point of sale
- Address - store's address
- Free credit - free credit limit - the amount for which the customer can still make orders
- Last event - date, when the customer was last visited or called
- Last document - date, when the last document was created for the customer
- Information - additional information about the customer sent through master data
Tapping on the customer opens a customer card.
Customer color specifications
White - normal status
Grey - the customer has an event or a created document on the current day
Red - the customer has a sales restriction, has not paid bills due date or has a negative account balance
Search for customers
The Search field in Customers tab searches the entered text from customer names and customer codes in real-time. It means in prompt of entering a character or a symbol, the results list will be updated automatically. The search results will consist of customers whose name or code include the character combination – fragment, entered into the search field.
Enter a fragment of a customer's name or code into the Search box to search for desired customer. Search can be performed with several fragments separated by %-sign in the same order as they are appearing in customer names.
Example. To find a customer named “Rannarootsi Shop Haapsalu”, enter into the Search box: ra%sho%haa

Customer card
Tap on the customer address to display the location on Google Maps and use its tools to retrieve the driving instructions.
Tap on the telephone number to start the call directly from the application.
Tap on the e-mail address to start the e-mail directly from the application
Tap on Amount overdue to display the details of the unpaid invoices. The details are available only when the respective information is synchronised between Telema EDI system and customer ERP.
While on customer card tap on device's menu button to display the following additional options:
- Edit - to edit the contact details: name of the contact person, telephone number and e-mail address.
This option is activated by Telema only when the service is ordered and client's ERP system is able to receive the information and make according changes in the database. - Assortment - to view customer specific assortment and prices
- Notes - for the user to make notes about the customer or visit to remind on the next visit. Notes are
- Last EDI orders - to view the last five EDI orders of the selected customer that were sent through Telema EDI System
- Photo - shortcut to capturing photo of the layout of the selected customer
At the bottom of the customer card the document history of that customer is displayed. Tapping on the documents opens the selected document. To copy the document tap&hold on the document until the respective menu opens, and select Create New from This. You can choose to copy only the quantities or the quantities and the discounts from the order selected. Note! When Telema MMT Visists module is used the copying functionality only works in the Visits window.
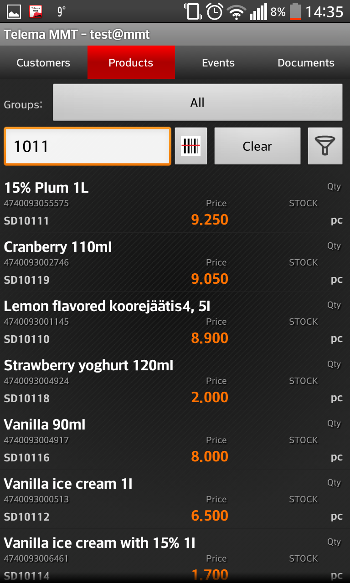
Products
The Products list displays up to 250 corresponding entries at a time in alphabetical order. Products search is performed in real-time based on the set search conditions.
Finding a product by name, GTIN-code and product code
The Search field in Products tab searches the entered text from product names, GTIN codes and product codes in real-time. It means in prompt of entaring a character or a symbol, the results list will be updated automatically. The search results will consist of products whose name, GTIN-code or product code include the character combination – fragment, entered into the search field.
Enter a fragment of a product's name or code into the Search box to search for desired product. Search can be performed with several fragments separated by %-sign in the same order as they are appearing in product names.
If the search words are correct and the corresponding product should definitely be displayed but is not, then it is possible that other search parameters can prevent form finding it. For example a group where the products does not exist has been selected. In this case, tap on button Clear to restore the search and try finding the product again.
Example. By inserting "1011" into the Search box you will be shown all the products whose name and/or GTIN-code and/or product's code has the combination “1011"
Finding a product from groups
In the Products tab choose Groups: All – a list of main groups appear.
If there are many groups, it is possible to create a favourite group – tap and hold a finger on a group and check the box Favourite. To delete a favourite group follow the same action.
Choose a group > if needed then select a subgroup – the application displays all products in the group.
If there are many products in a group, use the Search box.
Finding a product with scanner
In the Products tab tap on the scanner icon, after which the camera is activated and a box with a red stripe in the middle of it will appear on the screen.
Direct the camera towards the barcode, so that the barcode would fit in the box nicely. If necessary, move the device closer or further to the barcode, so that the camera could focus on the barcode.
With a proper focus, the camera regonizes the barcode itself and finds the right product – no buttons need to be pressed.
The scan’s success depends on room’s light, surface’s shine and other conditions.
Additional filters
In the Products tab tap on the button ![]() – it opens additional filters. Additional filtering options are shown here:
– it opens additional filters. Additional filtering options are shown here:
- Products over the past 5 orders – shows all products which have occurred over the last five order
- Product type labels - if any of the products has been assigned a type (e.g. Campaign) those product type labels will be listed here and you can use them to filter out the products of that type.
Activate filters as needed to find all necessary products.
Create an invoice
Creating an invoice is basically the same as creating an order. The only exception is the invoice’s display, where it has Payment term and Payment type as additional fields listed.
To make an invoice start a document as usually and choose the docuement type Invioice from the Document type field. Invoice option is only available when Telema MMT Invoices module has been activated.
Events
In the events tab all sort of customer registered events – visits and phone calls - will be saved.
Event is like a “container” for all the documents created for the same client. For example, when visiting one customer it can be necessary to fill in three orders for different departments, to fill in a questionnaire, etc. In that case, it is possible to display all the created documents within a single event. Of course, these documents will also be available in the document list, but there they will appear individually with other customers documents.
By default, only events with the status Unsent or Draft will be displayed. To display all events, even with status Sent, deactivate the option “Unsent”
Send events
Send button sends all Unsent events to Telema server. If an event has documents with status Draft, then that document and event won’t be sent, furthermore, documents with status Unsent will be sent. Also, documents with status Unsent in a Draft event will be sent.
Delete events
Choose the event that will be deleted from the Event tab > if the event is opened, press device' Menu button > Choose Delete > confirm your action
Documents
Documents menu displays all sort of created documents - orders, invoices, gallups, etc. The list will show:
- Customer's name - to whom is the document created
- Document - what type of document - order, invoice, gallup, etc
- Date - document's start date
- Status - draft, unsent or sent
- Sum - total sum of the document
By default, only documents with status Unsent and Draft will be displayed. To display all documents, even with status Sent, deactivate the option Unsent.
To open a document, tap on the document row.
Holding a finger on a document row opens an additional menu:
- Edit Header - opens the order's or invoice's display for editing
- Edit Contents - opens the document's contents for editing
- Delete - deletes the document
- Send to Server - sends the document to Telema server
- Create new from This - copies the document
- Draft - changes the document's status: when activating - status Draft, when deactivating - status Unsent
- Print - prints the invoice; the option is available for invoices only
- Share - alternative option to share an invoice
Send documents
Button “Send Documents” sends all documents with status Unsent to Telema server. Ony documents will be sent, events related to documents won’t be sent – these have to be sent separately in the Events tab.
To send only one document, tap and hold on the desired document until an additional menu opens > choose Send to Server – only one document will be sent.
Delete documents
Option 1. Hold a finger on the document until an additional menu opens > choose Delete > confirm the action
Option 2. Open the document > press on the device's Menu button > choose Delete > confirm the action
* This function only works when it is ordered with a Telema contract and when the respondent information and data is being sent from your company to Telema server regularly.