General
Using Telema MMT in PDA
To use Telema MMT in your PDA, the software must first be installed into your device. For that, contact Telema or your own IT department.
Turn on your PDA.
Press "Start" and choose "Telema MMT" from the list of software. Main menu will open.
In case of more that one user has been created into the software, a menu of choosing the correct user will open.
Choose your username and click on the button ![]() at the bottom of the screen. The main menu will open.
at the bottom of the screen. The main menu will open.
To close the software, click on the button ![]() at the bottom of the screen.
at the bottom of the screen.
Main menu
To start using one of the many functionalities of the software, click on the icons in the main menu.

Explanations of icons
| Customers | opens a list of customers | |
| Products | opens a list of products | |
| Documents | opens list of visits and orders | |
| Visit list | opens a list of scheduled visits | |
| Communication | Sending and receiving data | |
| Exit | closes the application | |
| Settings | Menu for managing settings | |
| User | Menu for managing users | |
| test.telema | User name | Name of currently active user |
| Keyboard | Activates on-screen keyboard | |
| 4.0.0.15 | Version | Telema MMT program version |
Send orders and update data
Make sure your Pocket PC is connected to the internet. See Set up internet connection section on how to set up an internet connection.
Tap ![]() button in the Main Menu to open Send & Receive Data menu.
button in the Main Menu to open Send & Receive Data menu.
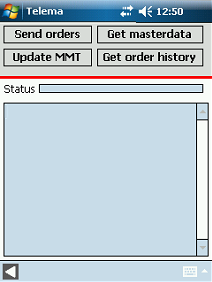
Send orders
Sends all documents with status "wait" and "Finished" - orders and visit records as well as gallup responses.
Get masterdata
Downloads any new information and updates for customers, products, prices, gallups, also the tasklist if it is composed in your company's ERP
Get order history
Downloads order history for the customers whose sales activity has been scheduled for the current day.
Update MMT
Single-tap update of your MMT application to a newer version. Make sure you do not have any started, unfinished or unsent documents in the Document List.
Tap ![]() to quit Send & Receive Data menu and revert ot Main Menu.
to quit Send & Receive Data menu and revert ot Main Menu.
Settings
Tap ![]() at the bottom of the Main Menu to display the settins window.
at the bottom of the Main Menu to display the settins window.
Tap ![]() to leave settings window.
to leave settings window.
Tap "Yes" in the confirmation dialog box to save changes, or "No" not to save changes.
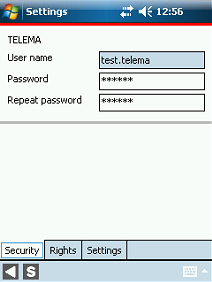
Security tab
Security tab displays user name and password fields for the current agent. Agent is linked with settings on server through his/her user name and password, and makes possible to download individual (user-based) information. It also addresses sent documents, so it is possible for company representative to follow the activities of each sales agent on Telema service web from any computer with internet access.
Rights tab
This is an informative tab only showing which activities are allowed for the current user.
Settings tab

Change and select the appropriate settings for the current user such as
- Order unit - default order unit
- Order No prefix - prefix to be included in front of the order number
- New Order No - number of the next order
- New Invoice No - number of the next invoice
- Save sent orders - if enabled, the application will keep the completed orders in the Document Library when sendig the orders to the server. If disabled, the sent orders will be removed from the document list.
- Language - set the preferred language of the user interface (UI).
- Auto fill client list - if enabled, then client list will be automatically filled.
Tap ![]() to save changes. Settings are saved and the Main Menu is displayed.
to save changes. Settings are saved and the Main Menu is displayed.
Set up internet connection
Over GSM
Over WIFI
Click on  and choose Turn Wireless ON. You will then be shown a list of available connections. Choose the right connection by clicking on it. Whether or not the connection is password protected, you might have to provide the correct password. You will be then connected to the Internet in a few seconds.
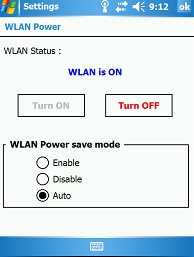
If you need to change the wireless settings the click on and choose Wireless Settings. You can turn WLAN status ON or OFF.
WLAN has three power saving modes: Enable, Disable and Auto.