Product, Price and Customer Data
Products
Tap ![]() to open the Product List. Products are grouped by categories.
to open the Product List. Products are grouped by categories.
Product List may contain the full list of your company products, or if your company has divided products among sales representatives, only those products assigned to you.
Product categories are also assigned by your own company.
To exit Product List and go back to Main Menu tap ![]() at the bottom of the window.
at the bottom of the window.
Viewing Product Information
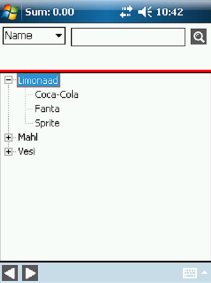
Open the Products Menu by tapping ![]() on the Main Menu. Products top-level category view will be opened.
on the Main Menu. Products top-level category view will be opened.
Option 1.
Tap on "+" in front of a category to expand the sub-categories. The bottom-level categories do not have "+" in front of them.
Select a bottom-level category and tap ![]() . The product list of the selected category will be displayed.
. The product list of the selected category will be displayed.
Option 2.
Select the search criteria (Name or Code) in the top left corner of the screen.
Tap on the searchbox next to the criteria field to insert the cursor in the searchbox.
Open the on-screen keyboard by tapping ![]() in the bottom right corner.
in the bottom right corner.
According to the selected search criteria type the product name or part of the product name, or the product code or part of the product code in the searchbox.
Tap ![]() in the top right corner of the screen. All the products that's name or code include the text inserted in the searchbox (regardless of the category) will be displayed.
in the top right corner of the screen. All the products that's name or code include the text inserted in the searchbox (regardless of the category) will be displayed.
Handling product list
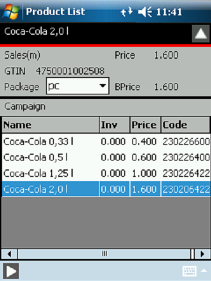
Product list table contains the following columns:
- Product name - name of product
- Inventory - warehouse inventory at the time of last update
- Price - base price of a product
- Code - supplier product code
There is a product details pane above the product list showing further details of a selected product:
- Sales(m) -
- GTIN - the global trade item number of the selected product
- Package - options of packages the selected product is available in
- Price - current price of selected product
- BPrice - base price of selected product
- Campaign -
To hide product details pane and display only product list tap ![]() in the top right corner of the window.
in the top right corner of the window.
To display the product details pane again tap ![]() in the top right corner of the window.
in the top right corner of the window.
To revert to the Products Category view tap ![]() at the bottom of the screen.
at the bottom of the screen.
Sort products
In the Product List window, tap on the column header to sort the products by that column. An asterisk appears after the column name of the sorted column.
Tapping on the same column header again will sort the list in reverse order.
Find products
In the products category view select the search criteria (Name or Code) in the top left corner of the screen.
Tap on the searchbox next to the criteria field to insert the cursor in the searchbox.
Open the screen keyboard by tapping ![]() in the bottom right corner.
in the bottom right corner.
According to the selected search criteria type the product name or part of the product name, or the product code or part of the product code in the searchbox.
Tap ![]() in the top right corner of the screen. All the products that's name or code include the text inserted in the searchbox (regardless of the category) will be displayed.
in the top right corner of the screen. All the products that's name or code include the text inserted in the searchbox (regardless of the category) will be displayed.
Document List
Open the Document List by tapping ![]() on the Main Menu.
on the Main Menu.
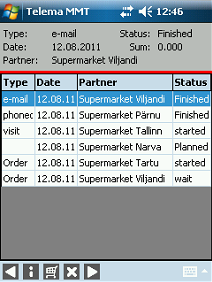
In document library overall activities of an agent appear: documents (such as sent, unsent, unfinished orders etc), and customer contacts (scheduled sales activities, finished client contacts etc).
At the top of the window more detailed data about the selected document is displayed, such as sum of an order
To quit Document library and revert to Main Menu tap ![]() at the bottom of the window.
at the bottom of the window.
Modify Document List
Document types
All activities and documents appear in one table with four columns:
- Type - type of document or activity (visit, phonecall, e-mail, order etc). For planned customer contacts no type appears as it is not defined yet what type of contact it is going to be (visit, phonecall or e-mail).
- Date - date of the document or activity.
- Partner - customer name with whom the activity or document is related to.
- Status – status of particular document or activity:
- Planned - customer contact (sales activity) is scheduled and has not taken place yet
- Finished - the customer contact (sales activity) is completed
- Started - the sales activity or the order has been started but not completed
- Wait - is used for orders that have been completed but have not been sent to the server yet
- Sent - is used for orders that have been sent to the server
Sort documents
In the Documents List window, tap on the column header to sort the products by that column. An asterisk appears after the column name of the sorted column.
Tapping on the same column header again will sort the list in reverse order.
Delete document
Select a document in the Documents List window.
Tap ![]() at the bottom of the window.
at the bottom of the window.
Tap "Yes" in the confirmation dialog. Document is deleted. Tapping "No" in the confirmation dialog will not delete the selected document.
View additional document information
NOTE! Additional document information is displayed only for orders (delivery details of the order).
Select a document (order) in the Documents List window.
Tap ![]() at the bottom of the window. Additional information of the document will be displayed.
at the bottom of the window. Additional information of the document will be displayed.
To revert to Document List tap ![]() at the bottom left corner of the additional information window.
at the bottom left corner of the additional information window.
View order
NOTE! Only documents (orders) with status "Sent" can be viewed without modification options.
Select a document (order) in the Documents List window.
Tap ![]() at the bottom of the window. Product list of the order will open.
at the bottom of the window. Product list of the order will open.
To revert to Document List tap ![]() at the bottom left corner of the order product list view.
at the bottom left corner of the order product list view.
Start new order based on another order
Select a document (order) of the customer in the Document List window whom you would like to create new order.
Tap ![]() at the bottom of the window. A confirmation dialog box will open.
at the bottom of the window. A confirmation dialog box will open.
Tap "Yes" in the confirmation dialog box. A new order based on the selected order will be created. At the same time new customer contact for the customer of the order will be created and added in the Document List.
Folow the instructions of Adding products to order section to change or add products to order.
Follow the instructions of Finishing order section to complete the order.
Follow the instructions of Finishing sales activity section to finish the sales activity of the current contact.
Modify order in the document library
NOTE! Only documents (orders) with status "Started" and "Wait" can be modified.
Select a document (order) in the Documents List window.
Tap ![]() at the bottom of the window. Order window will open.
at the bottom of the window. Order window will open.
Folow the instructions of Adding products to order section to change or add products to order.
Follow the instructions of Finishing order section to complete the order.
Update data
Make sure your Pocket PC is connected to the Internet. To set up an Internet connection please see ... section.
Tap ![]() button in the Main Menu to open Communication menu.
button in the Main Menu to open Communication menu.
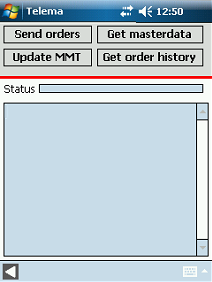
Tap "Get masterdata" to download and synchronize product, customer etc data.
Tap "Update MMT" to update MMT application to a newer version.
Tap "Get order history" to download the order history for the customers whose sales activity has been scheduled for the current day.
Tap ![]() to quit Communication tools menu and go back Main Menu.
to quit Communication tools menu and go back Main Menu.