Klientide visiitide haldamine
- Klientide nimekirja aken
- Visiidi koostamine
- Viisidi kuupäeva muutmine
- Visiidi kustutamine
- Ülesannete aken
- Kliendi visiidi salvestamine
NB! Laadige Masterdata alla enne kui hakkate plaanima visiite või üldse erinevaid toiminguid. Vajalik on see selleks, et teil oleks kõige uuem informatsioon MMT rakenduses. (vaadake rohkema info saamiseks Send & receive data sektsiooni).
Klientide nimekirja aken
Avage klientide nimekiri, klõpsates peamenüüs ikoonile ![]() .
.
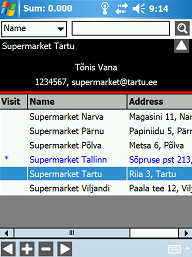
Nimekirjas kuvatakse klientide nimed ja aadressid. Sõltuvalt vastava ettevõtte eelistustest, võib nimekiri koosneda kõikidest klientidest või ainult Teie müügi portfelli valitud klientidest.
Klõpsates kliendi nimele ja siis klõpsates ülamenüü ikoonile  , avaneb kliendi info.
Kõikidel klientidel, kellele on planeeritud visiit, on Visiidi lahtris kliendi nime ees tärn ( * ).
Need kliendid, kellele on visiit planeeritud käesolevaks päevaks, on sinised (lisaks tärnile).
Juhul, kui ettevõte laadib üles krediidi infot, siis kliendid, kellel on võlgnevused, näidatakse punaselt.
Klientide sorteerimine
Klõpsake klientide nimekirja aknas üleval asuvale tulbale, et sorteerida kliente. Tärn ilmub sellesse lahtrisse, mille tulp on sorteeritud.
Klõpsates uuesti samale lahtrile, sorteeritakse tulp tagurpidi.
Klientide otsimine
Klientide nimekirjas võite otsida või filtreerida kliente nime või koodi järgi.
Valige ekraani ülevalt vasaku nurgast otsingukriteerium (nimi või kood).
Klõpsake otsingukastile.
Klaviatuuri avanemiseks klõpsake ikoonile ![]() .
.
Vastavalt valitud otsingu kriteeriumitele, kirjutage kliendi nimi või osa kliendi nimest, või kliendi kood või osa kliendi koodist otsingusse.
Klõpsake ekraani paremal üleval nurgas asuvale ikoonile ![]() . Kuvatakse kõik kliendid, kelle nimi või kood sisaldab teksti, mis on sisestatud otsingusse.
. Kuvatakse kõik kliendid, kelle nimi või kood sisaldab teksti, mis on sisestatud otsingusse.
Klientide nimekirjast väljumiseks ning tagasi peamenüüsse minemiseks klõpsake all asuvale ikoonile ![]() .
.
Visiidi koostamine
Kliendi visiidi käesolevale päeva peale koostamiseks, klõpsake Visiidi lahtrite peale. Visiit on koostatud, kui Visiidi lahtrisse ilmub kliendi nime ette tärn ( * ) ja rea esimene osa muutub siniseks.
Kliendi visiidi koostamiseks muuks ajaks tulevikus, valige klient, kellele sooviksite visiiti planeerida. Klõpsake akna alumise osas asuvale ikoonile ![]() . Avaneb pop-up kalender, kus on käesolev kuupäev on juba vaikimise valitud.
. Avaneb pop-up kalender, kus on käesolev kuupäev on juba vaikimise valitud.
Valige kalendrist soovitud kuupäev ja klõpsake "OK". Visiidi lahtrisse kliendi nimi ette ilmub tärn.
MÄRKUS! Parim viis kliendi visiidi koostamiseks on täpsustada järgmine visiit juba kliendi külastamise ajal. Nii koostatakse Ülesannete nimekiri igaks päevaks automaatselt töö käigus. Nüüd peate ainult iga päev Ülesannete akent üle vaatama.
Viisidi kuupäeva muutmine
Valige klientide nimekirja aknas klient, kellele on juba visiit planeeritud (tärniga klient).
Ülesannete nimekirjas valige klient.
Klõpsake ekraani allosas asuvale ikoonile ![]() . Kalender avaneb seal, kuhu hetkel kuupäev siniselt märgitud on.
. Kalender avaneb seal, kuhu hetkel kuupäev siniselt märgitud on.
Valige kalendrist uus kuupäev ja klõpsake "OK".
Visiidi kustutamine
Võimalus 1. Kõige kergem viis kustutamaks visiiti Klientide nimekirja aknas, on klõpsates kliendi ees oleva tärni peale. Kui tärn kaob ära, siis müügitegevused on kustutatud.
MÄRKUS! Süsteem kustutab visiite ilma kinnitust küsimata. Sellepärast ei pruugi see olla kõige kindlam viis visiidi kustutamiseks.
Võimalus 2. See võimalus on kasutusel mõlemas nii Klientide nimekirja aknas ja Ülesannete nimekirja aknas.
Valige klient, kelle müügitegevust soovite kustutada (tärniga klient)
Klõpsake akna allosas asuvale ikoonile ![]() .
.
Klõpsake kinnitusastis "Yes". Kui tärn kaob ära, siis müügitegevus on kustutatud.
Klõpsates kinnituskastis "No" ei kustuta valitud tegevust ja Klientide nimekiri kuvatakse taaskord.
Ülesannete aken
Kuvamaks Tänast ülesannete nimekirja...
... klõpsake peamenüüs ![]()
... klõpsake Klientide nimekirja aknas all nurgas asuvale ikoonile ![]()
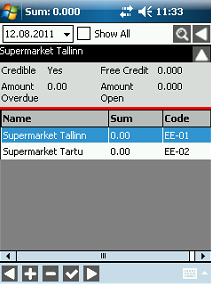
Vaikimisi kuvab ülesannete ekraan klientide nimekirja, keda tuleks külastada käesoleval päeval, kuvades järgnevat infot:
- Nimi – kliendi nimi
- Summa – kõikide tehtud tellimuste summa, mis on tehtud alates viimasest sessioonist “Tellimuste saatmine”
- Kood – klientide kood, mis on antud majandustarkvarast
Nimekirja üleval on antud kliendi krediidi info:
- Krediidi info peitmiseks klõpsake üleval paremas nurgas asuvale ikoonile
 .
. - Krediidi info uuesti kuvamiseks klõpsake uuesti ikoonile
 .
.
Kuvamaks mõlemad nii planeeritud ja lõpetatud müügitegevused, klõpsake linnuke kasti "Näita kõiki" ette ja siis klõpsake ikoonile ![]() .
.
Kuvamaks planeeritud müügitegevusi, klõpsake taaskord "Näita kõiki" ette olevale kastikelese, mis eemaldab sealse linnukese ja siis klõpsake ikoonile ![]() .
.
Kuvamaks planeeritud visiite teisteks päevadeks, valige ülevalt kalendrist vastav kuupäev ja klõpsake ikoonile ![]() .
.
Vaikimisi oleva ülesannete nimekirja kuvamiseks klõpsake uuesti ikoonile ![]() .
.
Ülesannete sorteerimine
Klõpsake Ülesannete aknas tulba päisele. Vastav tulp sorteeritakse ja sorteeritud tulba ette ilmub tärn.
Klõpsates uuesti samale tulba päisele, sorteeritakse tulp vastupidises järjekorras.
Kliendi visiidi salvestamine
Telema MMT võimaldab salvestada kõiki klientide visiite ning lisaks ka neid, kus ei looda ühtegi tellimust.
Kliendi visiidi salvestamiseks avage ülesannete aken ja valige klient, keda külastate.
Ülesannete akna sulgemiseks ja tagasi peamenüüsse minemiseks klõpsake lehe allosas asuvale ikoonile ![]() .
.
Küsitluse läbiviimine
Küsitluse funktsioon on suurepärane turunduse uuringu vahend, kogumaks oma ja konkurentide toodete, hindade ja positsiooni kohta informatsiooni. TÄHELEPANU! Küsitluse funktsionaalsust saab kasutada ainult MMT Premium paketiga.
Küsitluste kasutamiseks ja läbiviimiseks peavad need olema eelnevalt valmistatud Telema Web App’is.
Valige kuvatud nimekirjast küsitlus.
Täitke ära ja salvestamiseks klõpsake ![]() .
.
Visiidi algatmine
Valige ülesannete aknast klient.
Visiidi algatamiseks klõpsake![]() . Kuvatakse visiidi detailne vaade ning salvestestatakse dokumentide nimekirja.
. Kuvatakse visiidi detailne vaade ning salvestestatakse dokumentide nimekirja.
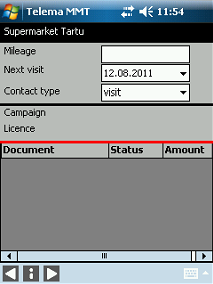
Valitud kliendi nimi kuvatakse ekraani ülaosas.
Ekraan on jaotatud kahte sektsooni:
1. Visiidi detailid ekraani üleval osas:
Odom näit. – märkimaks kliendini jõudmise vahemaad
Kontakti tüüp - täpsustamaks milline visiit on (e-mail, telefonikõne või külastus)
Järgm. visiit - täpsustamaks kuupäeva, millal järgmine visiit toimub
2. Tellimuse nimekiri ekraani alumises osas, kus koostatakse kõik tellimused kliendi viisid ajal:
Dokument – tellimuse number
Seisund - dokumendi staatus, tavaliselt "Started" or "wait"
Summa – tellimuse väärtus
Sisestage sobiv kuupäev Viisidi detailide sektsioonis.
Uue tellimuse sisestamiseks klõpsake ekraani allosas asuvale ikoonile ![]() .
.
Tellimuste nimekirja muutmiseks, valige vastav tellimus ja klõpsake ![]() .
.
Viisidi jaoks kommentaari sisestamiseks klõpsake ![]() . Sisestage kommentaar, kasutades ekraanipõhist klaviatuuri.
. Sisestage kommentaar, kasutades ekraanipõhist klaviatuuri.
Visiidi lõpetamine
Avage alustatud visiit, kui see pole veel avatud.
Käesoleva visiidi lõpetamiseks klõpsake ![]() :
:
- Viisidi lõpetamiseks klõpsake kinnituskastis "Yes". Visiidi seisund muutub "Finished" ja seda ei näidata Ülesannete nimekirjas. Kasutaja suunatakse peamenüüsse. TÄHELEPANU! Kliendi visiiti pole võimalik lõpetada, kui on veel alles lõpetamata tellimusi.
- Viisidi juurde hiljem tagasipöördumiseks klõpsake "No”. Viisidi seisund muudetakse "Started" ja seda näidatakse Ülesannete nimekirjas.
See on hea võimalus kasutamaks viisidi ajal, kui teine klient helistab samal ajal tellimuse tegemiseks. Nii on võimalik jätta käesolev visiit avatuks ja valida uus tegemiseks. Hiljem saate viisiti lõpetada. - Kui ei soovita viisiti hetkel lõpetada, siis klõpsake "Cancel".