Tellimuse koostamine
- Tellimuse koostamine
- Tellimuste koostamine eelmiste tellimuste põhjal
- Tellimuse vaatamine ja muutmine
- Tellimuste saatmine
MÄRKUS!
Peale tänaste visiitide määramist ja enne tellimuste tegemisega jätkamist tuleks alla laadida tellimuste ajalugu, et kindlustada see, et Teile on näha viimase toodete tellimuse kogused (vaata Saada & Võta Vaastu andmeid sektsiooni detailsema info jaoks).
PDA's tellimuse koostamiseks, võite kas alustada Visiitide nimekirjast (ikoon) või Dokumentide nimekirjast (ikoon).
Tellimuse koostamine
Alustage visiitide, nagu on kirjeldatud Visiidi alustamine sektsioonis. Avaneb visiidi detailide info vaade.
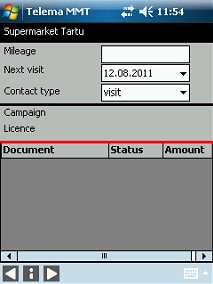
Uue tellimuse koostamiseks klõpsake akna allosas asuvale ikoonile ![]() . Avaneb toodete nimekiri. Tooted on grupeeritud kategooriate järgi.
. Avaneb toodete nimekiri. Tooted on grupeeritud kategooriate järgi.
NB. Kui tellimused on juba visiidi ajal eelnevalt tehtud (ja dokumentide all kirjas), peate valima kas "Edit" (olemasolevate tellimuste muutmiseks) või "Add new" (uute tellimuste koostamiseks).
Toodete lisamine tellimusele
Kategooria-puu kasutamine
Valige tootele vastav kategooria. Mööda kategooria-puud alla liikumiseks klõpsake kategooria nime ees olevale "+"-le.
Klõpsake akna allosas asuvale ikoonile ![]() . Kuvatakse valitud kategooria toodete nimekiri.
. Kuvatakse valitud kategooria toodete nimekiri.
Otsingu kasutamine
Valige ekraani vasakul ülaosas otsingu kriteerium (Nimi, Kood või GTIN).
Klõpsake kriteeriumi lahtri kõrval olevale otsingule.
Klõpsates all paremas nurgas olevale ikoonile ![]() , avaneb klaviatuur.
, avaneb klaviatuur.
Vastavalt valitud otsingu kriteeriumile, sisestage toote nimi või osa toote nimest, toote kood või osa toote koodist.
Klõpsake ikoonile ![]() . Kuvatakse kõik tooted, mille nimi või kood sisaldab sisestatud teksti (olenemata kategooriast).
. Kuvatakse kõik tooted, mille nimi või kood sisaldab sisestatud teksti (olenemata kategooriast).
Kui sisestate õige GTIN koodi, läheb programm automaatselt tellimuse vormile. Seal saate muuta või sisestada õiget infot. Lähemalt lugege sektsioonist Võimalus 2.
Valige nimekirjast soovitud toode. On olemas kolm võimalust, kuidas lisada toodet tellimusele:
Võimalus 1.
Valige toode.
Vajadusel valige sobiv koguse tüüp.
Klaviatuuri avamiseks klõpsake ikoonile ![]() .
.
Sisestage valitud toote jaoks kogus.
TÄHELEPANU! See on kiireim viis toote sisestamiseks tellimusele, kui pole vaja teha mingeid allhindlusi või hinda muuta.
Võimalus 2.
Valige toode.
Klõpsake ekraani allosas asuvale ikoonile ![]() . Avaneb "Edit" aken.
. Avaneb "Edit" aken.
Vajadusel valige sobiv koguse tüüp.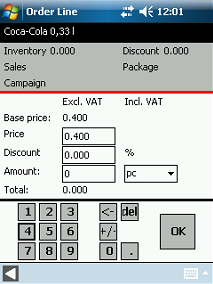
Klõpsake andmeväljale, mida soovite muuta. Antud lahtris terve teksti kustutamiseks kasutage ![]() , või tähtede kustutamiseks kasutage
, või tähtede kustutamiseks kasutage ![]() . Teine võimalus on märgitage pulgaga tekst ning siestada siis uus väärtus.
. Teine võimalus on märgitage pulgaga tekst ning siestada siis uus väärtus.
Sisestage sobivad väärtused kasutades aknas olevat numbrite välja - hind (kui see erineb baashinnast), allahindlus ja kogus sõltuvalt pakendamise tüübist.
Muudatuste salvestamiseks ja tagasi toodete nimekirja saamiseks klõpsake "OK". "Edit" aknast salvestamata väljumiseks klõpsake ikoonile ![]() .
.
Võimalus 3.
Valige toode.
Selleks, et näha valitud toote tellimuste ajalugu, vajutage ekraani allosas olevale nupule ![]() . Teile kuvatakse kuni viimase viie tellimuse kuupäevad ja kogused. MÄRKUS! Enne selle funktsionaalsuse kasutamist tuleb alla laadida valitud kliendi tellimuste ajalugu. Selleks minge peale praeguse päeva visiitide nimekirja loomist Kommunikatsiooni lehele (ikooni abil) ja vajutage nupule "get order history." Detailide jaoks vaata sektsiooni ....
. Teile kuvatakse kuni viimase viie tellimuse kuupäevad ja kogused. MÄRKUS! Enne selle funktsionaalsuse kasutamist tuleb alla laadida valitud kliendi tellimuste ajalugu. Selleks minge peale praeguse päeva visiitide nimekirja loomist Kommunikatsiooni lehele (ikooni abil) ja vajutage nupule "get order history." Detailide jaoks vaata sektsiooni ....

Valige kogus tellimuste ajaloo nimekirjast või sisestage kogus manuaalselt "Quantity" lahtrisse.
Toote lisamiseks tellimusele ja siis toodete nimekirja minemiseks klõpsake "OK". Klõpsates "Cancel", sulgetakse tellimuste ajalugu ilma muutusteta.
Tellimusele teiste toodete lisamiseks, klõpsake ikoonile ![]() , et avada jälle toodete nimekirja. Korrake ülalmainitud samme nii palju kordi, kui vaja, et lõpetada tellimust.
, et avada jälle toodete nimekirja. Korrake ülalmainitud samme nii palju kordi, kui vaja, et lõpetada tellimust.
Tellimuse lõpetamine
Tellimusele lisatud toodete kuvamiseks klõpsake ekraani allosas asuvale ikoonile ![]() (the basket view).
(the basket view).
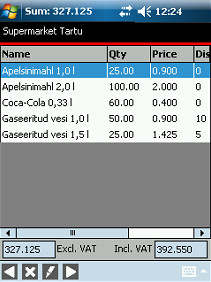
Basket view:
- Tellimusele toodete lisamiseks klõpsake
 . Klõpsates taaskord toodete kategoorias , suunatakse tagasi visiidi detailide vaatesse.
 - Tellimusest toote kustutamiseks klõpsake
 , ja kinnitamiseks klõpsake "Yes". Klõpsates "No", ei kustutata valitud toodet ning kuvatakse jälle basket view.
 - Toote hinna, koguse või allahindluse muutmiseks klõpsake
 .
.
Kui olete tellimuse sisuga rahul, siis järgmine samm oleks sisestada saatmise detailid. Klõpsake ekraani allosas asuvale ikoonile ![]() .
.
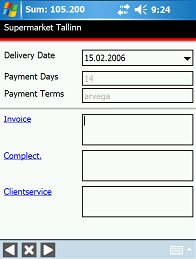
Tellimuse detailide aknas, valige saatmise kuupäev.
Võib tekkida vajadus lisada saatmisele kommentaar. Selleks on kolm võimalust:
Invoice - arve kohta käiv komentaar
Complect. - toodete komplekteerimise kohta käiv kommentaar
Clientservice - klienditeeninduse kohta käiv kommentaar
Samuti saate sisestada ka vahepealsete saatmise aadresse, aga seda ainult siis, kui see on erinev vaikimisi olevast tarneaadressist.
You can still go back to add more orders by tapping ![]() at the bottom of the delivery details window following by "Yes" in the opened save dialog box to save the changes made to the delivery details. Tapping "No" in the save dialog box will not save the changes made in the delivery details.
at the bottom of the delivery details window following by "Yes" in the opened save dialog box to save the changes made to the delivery details. Tapping "No" in the save dialog box will not save the changes made in the delivery details.
Tellimusele kommentaaride lsamiseks klõpsake ![]() .
.
Tellimuse lõpetamiseks klõpsake ![]() ja seejaärel kinnitades avanenud kastis "Yes". Tellimuse staatus muudetakse "Wait", ja müügitegevuste detailide aken avatakse edasisteks tegevusteks. Et jätta tellimus hilisemaks muutmiseks avatuks, klõpsake ettetulevas kastis "No", tellimuse staatus muudetakse "Started".
ja seejaärel kinnitades avanenud kastis "Yes". Tellimuse staatus muudetakse "Wait", ja müügitegevuste detailide aken avatakse edasisteks tegevusteks. Et jätta tellimus hilisemaks muutmiseks avatuks, klõpsake ettetulevas kastis "No", tellimuse staatus muudetakse "Started".
Tellimuste koostamine eelmiste tellimuste põhjal
Klõpsake peamenüüs ikoonile ![]() .
.
Valige selle kliendi tellimus, kellele soovite uut tellimust koostada.
Vajutage ekraani allservas olevale nupule ![]() . Avaneb dialoogiaken, mis nõuab kinnitamist - "Start a new order based on selected order?".
. Avaneb dialoogiaken, mis nõuab kinnitamist - "Start a new order based on selected order?".
Dialoogiaknas vajuta valikule "Yes." Luuakse uus tellimus, kuhu kantakse varemvalitud tellimusest üle kõik tooted ja kogused. Lisaks sellele algatatakse ja salvestatakse kliendi jaoks Document Listis uus tellimus.
Toodete koguse, hinna ja allahindluse muutmiseks valige vastav toode ha klõpsake ![]() .
.
Tellimusele toodete lisamiseks klõpsake ![]() ja järgnege Adding products to order instruktsioone.
ja järgnege Adding products to order instruktsioone.
Järgige Adding products to order instruktsioone, et muuta või lisada tellimusele tooteid.
Järgige Finishing order instruktsioone, et lõpetada tellimus.
Järgige Finishing sales activity instruktsioone, et lõpetada käesoleva kliendi müügitegevust.
Tellimuse vaatamine ja muutmine
Tellimuse vaatamine
Valige dokumentide nimekirja aknast dokument (tellimus).
Klõpsake ekraani allosas asuvale ikoonile ![]() . Kuvatakse tellimuse sisu (backet view).
. Kuvatakse tellimuse sisu (backet view).
Tähelepanu! Muuta saab ainult tellimusi staatusega "started" ja "unsent" (wait).
Tagasi dokumentide nimekirja minemiseks klõpsake ![]() .
.
Tellimuse muutmine
TÄHELEPANU! Muuta saab ainult tellimusi staatusega "started" ja "unsent" (wait).
Tellimuse muutmiseks on olemas kaks võimalust 1) alustades visiidi nimekriast ja 2) alustades dokumentide nimekirjast.
1. Visiidi nimekirjas tellimuse muutmine
Avage visiidi nimekiri (ikoon).
Valige nimekirjast klient, kelle tellimust soovite muuta. Kui klienti nimekirjas pole, siis klõpsake linnuke "Näita kõik" ette ja klõpsake ![]() .
.
Klõpsake ekraani allosas asuvale ikoonile ![]() . Avaneb müügitegevuste detailne vaade.
. Avaneb müügitegevuste detailne vaade.
Valige nimekirjast tellimus, mida soovite muuta.
Klõpsake ekraani allosas asuvale ikoonile ![]() ja siis "Edit" avanevas kastis. Avaneb tellimuse aken. Klõpsates avanenud kastis "Add new", saab alustada uut tellimust.
ja siis "Edit" avanevas kastis. Avaneb tellimuse aken. Klõpsates avanenud kastis "Add new", saab alustada uut tellimust.
Järgnege Adding products to order samme, et muuta või lisada tellimusele tooteid.
Järgnege Finishing order samme, et lõpetada tellimus.
2. Dokumentide nimekirjas tellimuse muutmine
TÄHELEPANU! Ainult dokumendid (tellimused) staatusega "Started" ja "Wait" on muudetavad.
Valige dokumentide nimekirja aknast dokument (tellimus).
Klõpsake ekraani allosas asuvale ikoonile ![]() . Avatakse tellimuse aken.
. Avatakse tellimuse aken.
Järgnege Adding products to order instruktsioone, et muuta või lisada tellimusele tooteid.
Järgnege Finishing order instruktsioone, et lõpetada tellimus.
Tellimuste saatmine
Veenduge, et Teie PDA oleks ühendatud Internetiga.
Klõpsake peamenüüs asuvale ikoonile ![]() .
.
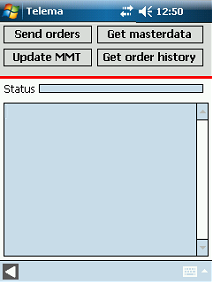
Kõikide koostatud dokumentide saatmiseks klõpsake "Send orders". TÄHELEPANU! Ainult tellimused saatusega "unsent" (wait) ja visiidid staatusega "Finished" saadetakse edasi serverisse.